Monday, December 6, 2010

Catproofing the harpsichord

Now that the case is complete there is one more very important task that has to be completed before I can glue the rose to the soundboard and start to string the instrument.

This harpsichord, like the historic Italian examples on which it is based, has a very light case and no lid. These instruments would typically have been placed inside a completely separate outer case for protection. I do not have an outer case, but I do need to build some kind of lid so that Isis will not be able to go to sleep on the soundboard or shred the rose into tiny pieces.

I considered several options including buying an outer case from Zuckermann (too expensive at over $3,000), building an outer case myself (too time consuming to do right now, although I might do it later), and simply attaching a lid to the case (which looks like it might just be possible but overall I don't think that the inner case is really strong enough for this). In the end I came back to one of my first ideas which was to build a lightweight lid that could sit securely on top of the instrument and easily be lifted off.

The lid itself consists of a piece of 1/8" MDF with a frame made of poplar running around the edge both to stiffen the lid and to locate it over the sides of the case. I wasn't sure when I started whether this was just going to be a temporary solution that would eventually be replaced by something else but it turned out very well so I added a few pieces of molding around the edges and this is the (almost complete) result:


The Rose

Many harpsichords have a hole cut in the soundboard which is decorated with an ornament known as a Rose. These come in a number of different styles but Italian harpsichords usually have roses based on geometrical patterns and made of parchment or, sometimes, wood.

I ordered a simple but very elegant rose from Elena Dal Cortivo which has just arrived.

The rose consists of two separate pieces which will be glued on top of each other around the hole that has already been cut in the soundboard.


There is, however, one very important step that now has to be completed before the rose can be glued in place ...

Finishing the case

Once the soundboard is in there are still a few things that need to be done to finish the case.

First there are decorative moldings made of cherry that are fitted around the edge of the soundboard. As with the outer moldings the one that follows the curve of the bentside is the most difficult one to fit. The molding is fairly thin and flexible but it is still difficult to get it to fit tightly around the curve. I used a combination of nails to hold the molding in position, blocks of wood and clamps to apply pressure to it, and some small pieces of wood wedged between the molding and the bridge to hold it firmly against the case.


Once the soundboard moldings are complete the holders for the jack rail are fitted:


These have to be positioned very carefully so that the jack rail will slide smoothly into place directly over the the gap where the registers and jacks will eventually be installed.

Finally the inner molding at the top of the case and the cap molding are fitted, and the case is (almost) done.

Tuesday, November 16, 2010

Gluing in the soundboard

It has taken so long to get to the point where I am ready to glue in the soundboard that I have had a lot of time to think about the best way of doing it.

Professional harpsichord builders would use a go bar deck like this one from Michael Johnson's web site.

Kit builders usually end up having to use nails to hold the board in place while the glue dries, but after my experiences with using nails to secure the outside moldings to the case I have come to the conclusion that, while an experienced craftsman could probably do a very good job just using nails an amateur is probably better off using clamps if at all possible.

Even though I still have a long way to go before this instrument is finished, I am enjoying the process of building it so much that I have a feeling that it will not be the last one that I build and that makes it easier to justify buying a "few" more clamps as an investment ...

After carefully measuring several different types of clamp I came to the conclusion that a 12" Jorgensen light duty bar clamp would work both for this harpsichord and also for any other instrument that I might build in future.

So, finally, here is the soundboard being glued in:

There are a total of 51 clamps - 39 F clamps around the edge of the case and 12 small C clamps in the gap between the soundboard and the wrestplank.

I used liquid hide glue for the soundboard - not so much out of any desire for "authenticity" but mostly to take advantage of its longer open time - it took me almost exactly 20 minutes from applying the glue to tightening the last clamp.

Catching up

The soundboard was ready to go in almost a month ago but the weather did not cooperate with my schedule - there was a perfect weekend at the start of October, but I was away in Los Angeles and, by the time I got back, it had started raining an the relative humidity was up to 65% and the soundboard was showing some distinct curvature.

While I was waiting for the perfect day to glue in the soundboard I tried to finish up as many of the other small tasks as possible.

I varnished the legs:


and assembled several other parts:

The name board:

The jack rail:
and the music desk:

I also moved the case and the soundboard inside the house:

Saturday, October 16, 2010

Fitting the outer moldings

I want to do as much work as possible on the case before I glue in the soundboard so the next thing to do is to attach all of the decorative moldings to the outside of the case and that means cutting lots of mitre joints.

The harpsichord kit came with a mitre box that has all of the correct angles for cutting the different joints which helps a lot. Fortunately I already know from past experience that I am almost completely incapable of getting mitre joints right the first time that I cut them so, accepting that inevitable reality I cut all of the joints with pieces of scrap wood first and then, when I have got them correct I cut the moldings to match.

Attaching the bottom molding to the bentside is going to be challenging - it is about 1/4" thick and, while it is just possible to bend it to fit the curve of the bentside it is going to be really difficult to attach it no matter how many nails I use. Eventually I decided that it would be better to bend the molding first before attempting to attach it so I built a form that matches the curve of the bentside out of two pieces of 3/4" plywood and an improvised steamer out of some 2" black ABS pipe and an old kettle. After steaming the molding for about 20 minutes I clamped it to the form like this.


I wasn't sure whether I had steamed the wood for long enough but, after leaving it clamped to the form overnight, it held its shape very well.

The top molding on the bentside was thinner, more flexible and much easier to clamp in place so I didn't bother pre bending it and just used lots of clamps.


Once everything was attached and all of the excess glue had been cleaned up it looks like this:


Monday, September 20, 2010

Thinning the soundboard and attaching the bridge

This weather was a little cooler this weekend and the relative humidity stayed around 50% for most of the time so it was a good opportunity to get some more work done on the soundboard.

The soundboard is 1/8" thick and has to be thinned down to about 3/32" in several places around the edges. This is really quite easy to do with a good sharp plane and the soundboard securely clamped down to the workbench. I started out very slowly and carefully getting the edges down to just the right thickness and then working gradually inwards. Things went a bit faster once I got some confidence in what I was doing and pretty soon it was all done.

Attaching the bridge was something that I was quite worried about. Gluing on the nut had turned out to be much more difficult than I had expected and I had a couple of near disasters while doing it although I was able to recover from all of them. The biggest problems were with the nails used to position and hold down the nut during gluing. The nut, which has exactly the same profile as the bridge has a "step" in it at the top - the nail goes through a hole in the lower part of this "step" and you have rely on the cardboard pads on the nail to distribute the pressure evenly. This turned out to be easier said than done and I dented the wood just a little in a couple of places, but fortunately was able to apply a damp cloth to those areas and get the wood to swell back into place. The second problem was getting the nails back out again! The wrestplank into which the nails have been hammered is made of oak - it is bad enough trying to get the nails to go into it and even more difficult to get them to come back out again. Of the 9 or 10 nails used to hold down the nut only 4 came out cleanly - the heads broke off all of the others. Of those I managed to get all but 2 out using a vice grip, but the last 2 just wouldn't move so I had to clip them off as close to the hole as possible and then trying hammering them just a little further in using a nail set.

So, when it came to the bridge (which was going to need 19 nails) I changed a few things.

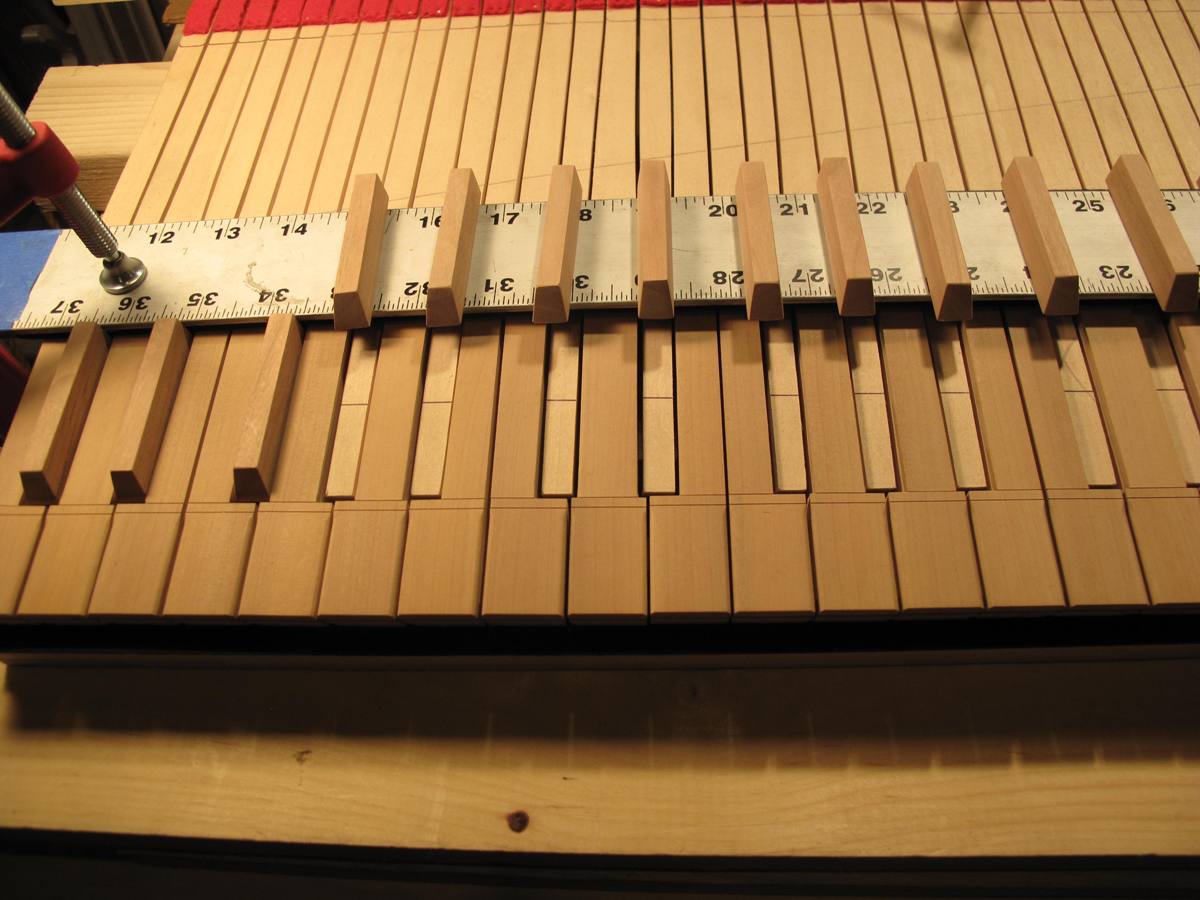
The first thing that I did was to go looking for some stronger nails - I found some #17 nails which were quite a bit thicker than the ones that had been supplied but still fit easily through the 1/16" holes in the bridge. I also decided to use something better than just cardboard pads to cushion the nails and I found some small cork pads with a self adhesive backing that looked suitable. I put two of them together back to back and then attached half of a third pad to create a step that approximately matched the profile of the top of the bridge. I then added a cardboard pad on top to stop the nail from just embedding itself in the cork.

I then did a few experiments to make sure that I could hammer these nails into the plywood top of the workbench and still get them out again and reassured myself that it seemed to be possible.

So with lots of masking tape to catch as much of the glue as possible I went ahead and glued down the bridge. A lot has to be done very quickly to get the bridge positioned and nailed down so I didn't have time to take any pictures of that process, but here are a few shots of how it looked once the masking tape was removed.


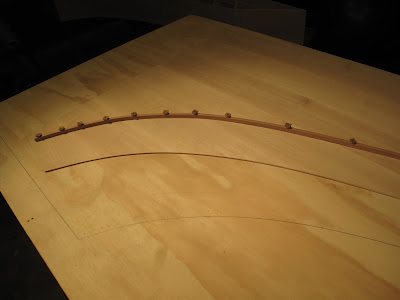
Here you can see how the stack of cork pads compresses and deforms nicely to match the profile of the bridge.
... and this time all of the nails came out in one piece ...

There is still more work to be done to attach some wooden ribs to the underside of the soundboard before it can be glued into the case, but here are some shots of it sitting in place with the bridge glued down.


Monday, September 13, 2010

Attaching the nut

Before gluing down the nut I put it back in place and masked off the area around it to try to minimize the amount of glue that I will have to clean up later.


After the glue has set and the nails have been removed the nail holes are plugged with small pieces of wood and sanded smooth.


Here you can see the newly drilled wrestplank with the registers and keyboard in place.


A close up of the bass end of the wrestplank.


Finally a shot with the nameboard in place.

Drilling the wrestplank

This instrument has two sets of 53 strings so there are 106 tuning pins and 106 holes that have to be drilled. I put a block of wood along the front edge of the wrestplank so that I could use a drill guide for this operation. The holes are drilled at a slight angle so that they lean back from the wire at about 5 degrees.


Marking out the nut and the bridge

The harpsichord kit comes with a full size mylar drawing that is used to determine the position of the bridge (which is attached to the soundboard) and the nut (which is attached to the wrestplank).

The part of the drawing that represents the soundboard, the gap and the wrestplank is cut out and laid in the case.


The nut is positioned by drilling some small 1/16" holes through it and nailing it through the drawing into the wrestplank.


The bridge is positioned in the same way by placing the soundboard onto the workbench with the drawing on top of it, drilling holes through the bridge and nailing it down.


The bridge has already been bent to approximately the correct shape, but the curved portion towards the treble end still needs some force applied to it in order to get it to line it up in exactly the right position.


Here everything is nailed in place including the separate bass section that butts up against the main bridge.


Close up of the bass end of the bridge.

Gluing the wrestplank veneer

The wrestplank is made of oak but is covered by a thin 1/8" veneer made of maple - the same material as the case. This has to be cut to size and then glued down. Unfortunately the sheet of wood is slightly warped and, although keeping it at about 45% relative humidity for several weeks with some weights on top of it has helped it still isn't perfectly flat.

I hope that if I do a good enough job of clamping it down during the gluing process things will be OK. The construction manual suggests using heavy books to weight things down but I am going to go a little further than that - I am going to put a sheet of plywood on top of the veneer, clamp it round the edges with all of the clamps that I have and put weights on top in the middle.

Here is the dry run to figure out the position of the clamps ...


... and here it is for real with 15 clamps and 130 pounds of weight ...


I left it clamped overnight, and 16 hours later it looks like this:


Here is a closeup view of the edge of the veneer

Tuesday, September 7, 2010

Soundboard 1

Now that the keyboard is substantially complete and the weather has settled down again after an unexpected heat wave that resulted in record temperatures for a few days I can start working on the soundboard.

The soundboard has already been cut to approximately the correct size and shape but it is slightly over sized so the first thing that needs to be done is to fit it to the case by cutting it down to exactly the right size.

I started out by attempting to make a cardboard template that was exactly the size that the soundboard needed to be. This was only partially successful - I used a sheet of corrugated cardboard salvaged from the box in which the parts had been shipped, but it was difficult to cut accurately and I wasn't really satisfied that the result was accurate enough to be useful.

Since I had a sheet of hardboard lying around I decided to practice on that before tackling the soundboard itself. I drew the outline of the actual soundboard on to the hardboard and then cut the hardboard to approximately the right shape using a jigsaw. Then I started to try to fit the hardboard to the case. This took several hours but at the end everything fit (almost) perfectly and I had learned some valuable lessons along the way. I say that the fit was "almost" perfect because within the first 15 minutes or so I had succeeded in breaking off about two inches of the very acute angle at the tail by twisting the board slightly as I took it out of the case - something I vowed not to do with the real soundboard ...

Now that I had an accurate template I started to figure out the best way to tackle the soundboard itself. I was able to verify that the long straight edge of the soundboard that fits along the spine of the instrument was, indeed, perfectly straight so I lined the hardboard template up along that edge and marked around it on the soundboard. It looked as if about 1/2" needed to come off the tail, the straight part of the bentside and the cheek and a bit more - perhaps 3/4" - from the curved part of the bentside.

I started off by planing the cheek down until it just fit in the case - then I could start to slide the soundboard in and see how well it was going to fit. Since everything looked OK I trimmed the tail down to about 1/8" over size using a veneer saw and checked the fit again. Things still looked good so I decided that it was safe to cut the bentside down to 1/8" over size as well - I used a plane for the straight part of the bentside and a coping saw for the curved part.

Getting rid of that last 1/8" was a very slow and careful process that took place over the next two evenings. Things would have been quicker if I had the skill to use a spokeshave to trim the curved part of the bentside, but preliminary experiments with some scrap wood quickly convinced me that while I could use a block plane reasonably effectively I was likely to do a lot more harm than good with the spokeshave so I took the safe but slow option of using 80 grit sandpaper to get the curve just right.

Monday, August 30, 2010

Keyboard 2

The assembly of the keyboard is now complete, although it will undoubtedly need a little more adjustment before it is really finished.

Gluing on the tops of the sharp keys didn't turn out to be nearly as difficult as I had expected it to be.

Here everything is lined up in place ready to be glued - a piece of wood is clamped down onto the tails of the keys at the back of the keyframe to keep everything in place. A steel ruler is used to provide a straight edge to line up the back of the key tops.


The three leftmost key tops are now glued in place.

In order for the keyboard to work correctly the keys all have to be balanced so that they rest in the "up" position and require a consistent amount of force to press them down. This is done by drilling holes at appropriate places in the side of the key and inserting lead weights to achieve the desired effect. Each key is balanced individually by putting a small weight on the front end of the key and then moving a piece of lead up and down along the key to find the balance point. Once that is determined a hole is drilled in the side of the key at that point and the lead weight is inserted. Because the natural keys come in several different shapes and sizes the amount of weight needed and its exact position can vary quite a lot from key to key. The sharp keys on the other hand are much more consistent in size and, on this keyboard, were already almost perfectly balanced.

The only thing left to be done to the keyboard is a final light sanding of the key tops and an oil finish.

Now it's almost time to start thinking about fitting the soundboard but before I do that I want to make sure that everything else is going to fit perfectly.

Note that all stages of harpsichord construction are being closely monitored ...


Here the keyboard and the box guide registers are in place along with the nameboard and the decorative key end cheeks. Both the keyboard and registers fit perfectly.


The end cheeks will need to be carefully filed to match the case once they are glued in place but they too are a good fit and shouldn't present any problems.