The bentside is steam bent on a form to approximately the correct shape but needs to be carefully clamped when it is glued in place.
A band clamp with a ratchet does most of the work but I also used several Veritas Wonder Dog clamps.
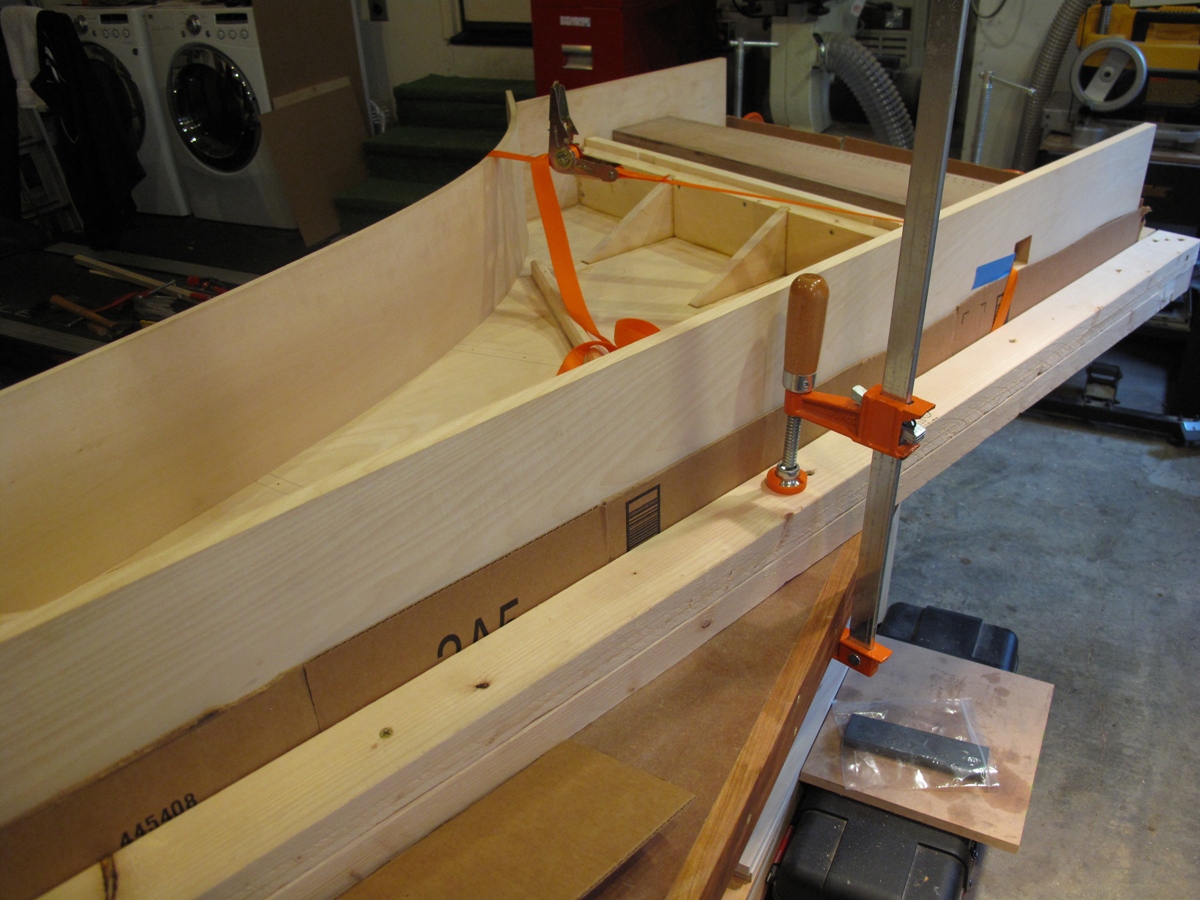
Here you can see the band clamp holding the bentside in place.

In order to get the clamps in the best position on the bentside the instrument had to be set at an angle on the workbench with blocks of wood clamped to the bench along the spine and the front edge of the case to hold it in place.

Here you can see how the Veritas Wonder Dogs were used to clamp the bentside along the bottom edge.

Almost ready to assemble - the masking tape makes it easier to get the glue in the right place.

A few minutes later and it is both glued and screwed into place. At this point the screws are doing almost all of the work of holding the joints together but I left all of the clamps in place overnight to give the glue time to reach its full strength.


Once the glue has set and the clamps have been removed the bentside is trimmed flush with the cheek and the tail.

It's interesting that the bentside is glued on at this point. If Hubbard is anything to go by, presumably old Italian instruments built up all the frame work and liners first, and the bentside was simply a cladding to skin it with.
ReplyDeleteD'oh! It just occurred to me that this is a false inner - outer design, whereas the other method was for the delicate inner instrument only.
DeleteYes, I think that this is a somewhat unusual way to go about things even for a false inner-outer instrument. It would seem more natural to fit the knees to the base and then fit the liners before putting on the bentside. Take a look at this series of pictures by Rob Brooke - http://www.fototime.com/ftweb/bin/ft.dll/pictures?userid=6D924CDB07174764A01BC9F52983EA01&inv=CBF4EECEE6F3021 - and you will see that is exactly what he does. In this case, however, the instructions were to fit the bentside first so that is what I did ...
ReplyDeleteLooks like a great site to mine info from. Thanks for pointing to it.
DeleteI'm glad to see your bentside is as oversized as mine. When I put it near the case I began to wonder if they'd sent me the wrong part! There's something like 5-6" excess.
ReplyDeletecase = base(board)
DeleteYes, the bentside as supplied should overhang by about 2-3" at both the cheek and the tail.
DeleteBy the way (and I probably don't need to tell you this but I will anyway) you need to be aware that, while the screws will do a good job of holding the bentside in place while the glue sets the will *not* be able to actually pull it into position. The wood is thin and quite soft and if you attempt to close the gap between the bentside and the base by just tightening the screws you will most likely just chew a hole in the bentside. You really need to get the joint tightly closed first and then just use the screws to hold it.
On a similar note, while you will definitely want to do a dry run and screw the bentside in place without the glue to make sure that everything fits there is a definite limit on how many times you can expect to reuse the same screw holes and have the screws continue to hold. My guess is that three times is probably about the limit so I was very careful to do just one dry run without glue before final assemmbly. Of course if something doesn't fit the first time you may have no choice, but in that case you may want to consider using fresh screw holes.